Everything you need to grow 500-1,000+ pound pumpkins.
If you want to learn how to grow giant pumpkins that reach 500, 1,000, or even 1,900+ pounds, you’re in the right place.
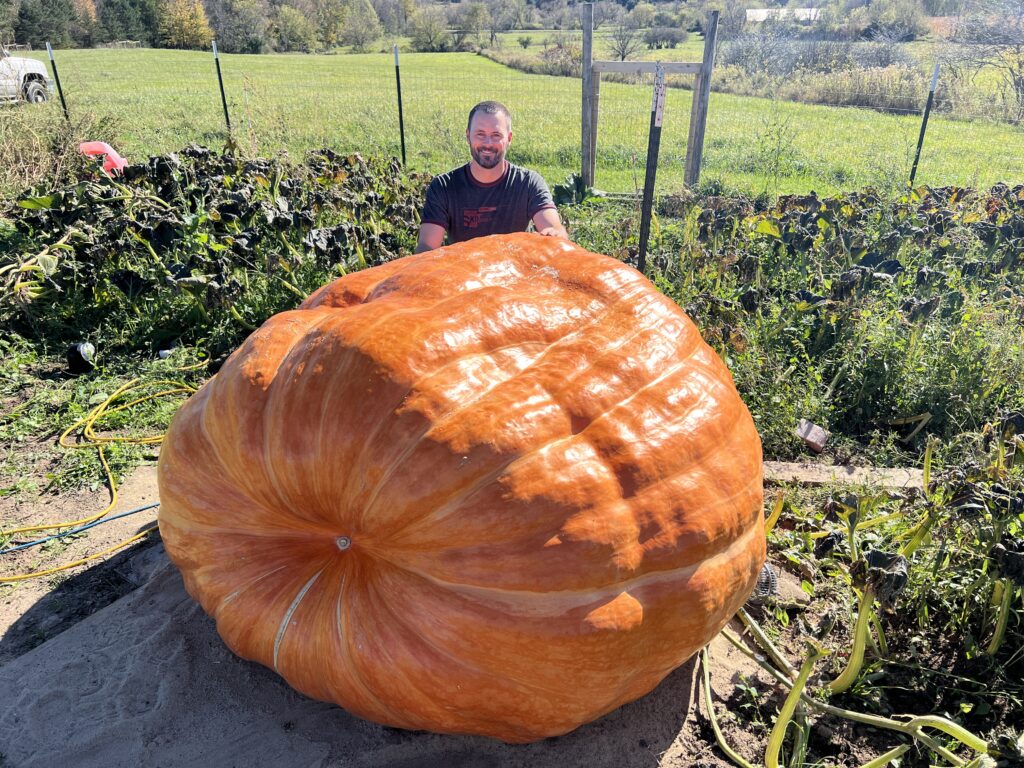
I’ve been growing giant pumpkins since 2021, and during that time I’ve produced four pumpkins over 1,800 pounds. My four biggest are 1814 lbs, 1931 lbs, 1970.5 lbs, and my personal best of 1986 lbs grown in 2025. Each year I’ve refined my approach to seed starting, soil preparation, genetics selection, fertilization, vine management and fruit management to consistently grow bigger pumpkins.
Giant pumpkins aren’t grown by luck. They’re grown by strategy. From choosing proven genetics to hand pollinating, tracking weekly growth and preparing for weigh-off day, every step matters.
In this complete step-by-step guide, I’ll show you exactly how to grow a giant pumpkin from seed to scale, using the same methods I use to grow competitive pumpkins almost 2,000 pounds.
Step 1: Start with the Right Giant Pumpkin Seeds
If you want to grow a giant pumpkin, the very first step is choosing the right seeds. Not all pumpkin seeds are the same. The seeds you find at a big box store can grow nice pumpkins, but they usually aren’t bred to produce true giants.
Giant pumpkins get their incredible size from years of careful breeding. Growers select seeds from their biggest pumpkins and control how they are pollinated to pass along strong size genetics to the next generation. Over time, this selective breeding is what allows pumpkins to grow into the thousands of pounds.
If you’re serious about growing a giant, starting with proven giant pumpkin genetics gives you a huge advantage right from the beginning.
The seeds I offer come from my 1931 lb, 1970.5 lb, and 1986 lb pumpkins which were all big, orange giants with strong genetic backgrounds. These are the same types of seeds competitive growers use when aiming for massive weights.
👉 You can check out my available giant pumpkin seeds here: Giant Pumpkin Seeds for Sale
Step 2: Starting Giant Pumpkin Seeds the Right Way
Once you have strong genetics, the next step is properly germinating your giant pumpkin seeds. How you start your seeds can make a big difference in early plant vigor, which ultimately impacts how well your pumpkin performs throughout the season.
📌 Learn More: For a full step-by-step guide on starting giant pumpkin seeds, including soaking, sanding, planting angles, soil preparation and my unique germination method, check out my Giant Pumpkin Seed Starting Page.
Step 3: Soil Preparation & Patch Setup
If you want to grow a truly massive pumpkin, your soil needs to be ready long before the vine starts running. Giant pumpkins are extremely heavy feeders, and building the right soil foundation can make the difference between a decent pumpkin and a personal best.
Start with Healthy, Well-Draining Soil
Giant pumpkins thrive in loose, well-draining soil rich in organic matter. Compacted soil restricts root growth, and poor drainage can lead to disease and slow development.
Before planting, loosen the soil deeply and work in plenty of organic material such as compost or aged manure. This improves soil structure, encourages beneficial microbial activity, and helps roots expand aggressively throughout the patch.
Test Your Soil
One of the smartest things you can do is perform a soil test. Knowing your soil’s pH and nutrient levels allows you to make targeted adjustments instead of guessing.
Giant pumpkins prefer a slightly acidic to neutral pH, generally around 6.5–7.0. Adjustments with lime, sulfur, or specific nutrients should be based on test results.
I didn’t do a soil test and adjust the nutrients in my patch until my 3rd year. That year I grew a 1931 pound pumpkin and 1970.5 pound pumpkin, which increased my personal best by over 500 pounds (was previously 1430 pounds)!
Plan Your Space
Giant pumpkin plants need a lot of room. Plan for at least 300–500 square feet per plant so the vine can spread properly. I actually give each of my plants 1,000 square feet. Adequate spacing improves airflow, reduces disease pressure, and allows the plant to support a massive fruit later in the season.
Choose a location that:
- Gets full sun (8+ hours daily)
- Has good drainage
- Is protected from strong winds if possible
Build the Foundation for a Big Season
The work you put into soil preparation pays off all season long. Strong roots support faster vine growth, better nutrient uptake, and ultimately bigger pumpkins. Other than starting with good genetics, getting your soil dialed in is probably the next most important thing you can do.
Step 4: Planting & Early Growth
Once your soil is prepared and your seeds are started, it’s time to get your plant in the ground and focus on building a strong, healthy plant. This early stage is all about setting the foundation for explosive growth later in the season.
Transplanting Your Seedling
Timing matters. Giant pumpkin seedlings are typically ready to transplant about 10–14 days after germination, once they have a solid root system and their first true leaves. Before transplanting mine outside, I typically end up transplanting to a larger pot which gives me a little extra time inside. Mine normally are around 21-25 days old when they are transplanted outside.
Before transplanting, harden off your plant by gradually exposing it to outdoor conditions over a few days. This helps prevent transplant shock.
When planting:
- Handle the seedling carefully to avoid disturbing roots
- Plant it slightly deeper than it was in the pot, especially if your plant is leggy
- Water it in thoroughly
I like to plant mine on a slight mound to improve drainage and warm the soil faster in spring.
Protecting Young Plants
Your plant is most vulnerable during the first few weeks.
Common threats include:
- Cold nights
- Strong winds
- Insects
To protect your plant early on, consider:
- A small greenhouse, cold frame, or low tunnel
- Frost blankets on cold nights
- Wind barriers if your patch is exposed
I build temporary hoop houses for my plants to keep them warmer and protected from the weather. Keeping your plant warm and stress-free early can significantly improve early growth speed.
Early Vine Growth
Once established, your plant will begin to vine quickly. This is where things start to get exciting.
Your goal during early growth is simple:
👉 Grow a large, healthy plant as fast as possible
The bigger the plant, the more energy it can produce later for your pumpkin.
Focus on:
- Consistent watering (deep, not shallow)
- Avoiding plant stress
- Encouraging steady, uninterrupted growth
Training the Main Vine
As the main vine begins to run, start guiding it in the direction you want it to grow. Most growers train their main vine in a straight line to maximize space and keep the patch organized.
Secondary vines (side vines) will grow off the main vine. These should be positioned perpendicular (90 degrees) to the main vine.
As your plant continues to grow, you’ll also notice tertiary vines forming off the secondary vines. These should be removed early.
Tertiary vines:
- Take energy away from the main plant
- Create unnecessary crowding
- Reduce airflow and increase disease risk
By removing tertiaries, you’re directing all of the plant’s energy into the main vine, secondaries and eventually the pumpkin you want to grow big.
Proper vine positioning:
- Improves sunlight exposure
- Increases airflow
- Makes your patch easier to manage later
Burying Vines for Root Growth
One of the biggest advantages you can give your plant is encouraging additional root development along the vines.
As your vines grow:
- Gently bury the vines with soil at each leaf node
Each buried node can form additional roots on the top and bottom of the vine, which:
- Increases nutrient uptake
- Improves water absorption
- Supports a larger pumpkin later
This is one of the key differences between average growers and competitive growers.
Watering in the Early Stage
Water deeply and consistently, but don’t overdo it.
- Avoid frequent shallow watering
- Keep soil evenly moist, not soaked
- Water at the base (not over leaves) to reduce disease risk
As your plant grows, its water demand will increase quickly.
What to Expect Next
During this stage, your plant is focused entirely on growth, not pumpkins yet.
Within a few weeks:
- The vine will begin to run aggressively
- Secondary vines will fill your patch
- Flowers will start to appear
This leads directly into the next critical phase: pollination and selecting the pumpkin that will become your giant.
Step 5: Pollination & Fruit Selection
This is where your season starts to become real. Up until now, you’ve been building the plant. In this step, you’re choosing and creating the pumpkin that will (hopefully) become your giant.
Done right, this stage can make the difference between an average pumpkin and a personal best.
Understanding Pumpkin Flowers
Giant pumpkin plants produce two types of flowers:
- Male flowers: long, thin stems with pollen
- Female flowers: have a small baby pumpkin (ovary) at the base
Only female flowers can turn into pumpkins, but only if they are successfully pollinated.
Why Hand Pollination Matters
If you leave pollination up to bees, you lose control over genetics, which is very important in the giant pumpkin community.
Bees can bring in pollen from:
- Other pumpkin plants
- Squash varieties
- Unknown genetics
That unpredictability won’t affect the size of your current pumpkin, but it does affect the genetics of the seeds inside it, which matters if you plan to grow or share seeds in the future.
Hand pollinating allows you to:
- Control the cross (which genetics you combine)
- Increase pollination success
- Improve your chances of growing a bigger pumpkin
How to Hand Pollinate
Pollination happens early in the morning, usually right after sunrise when flowers are fully open.
Steps:
- Identify flowers that will open the next morning
Look for female flowers with a plump, bright yellow bud that’s starting to loosen at the tip. The petals may show slight separation or a soft “twist.”
Do the same for male flowers you plan to use. - Close and secure the flowers the evening before
Gently gather the petals of both the male and female flowers and tie them shut with a soft string or use a clip. This prevents bees from getting in before you do. - Prepare for pollination in the morning
At sunrise, carefully cut or untie the string on the female flower so it can open naturally. Keep it protected until you’re ready to pollinate. - Select your male flowers
Pick 1–3 freshly opened male flowers (from your plant or a chosen cross). - Remove the petals
Peel back or remove the petals to expose the pollen-covered stamen. - Transfer the pollen
Gently brush the pollen onto the stigma inside the female flower, making sure to fully coat all lobes. - Re-cover the female flower
Once pollinated, close the flower back up and secure it (string or a bag) to prevent unwanted pollen from bees.
Choosing the Right Pumpkin
Not every pumpkin should be kept. In fact, you’ll likely pollinate several before selecting “the one.”
Here’s what to look for:
Position on the vine
- Ideally 10-15 feet out on the main vine
- Allows the plant to support more weight and growth
Shape and structure
- Even, symmetrical shape
- Wide and squat is often preferred over tall and narrow
Healthy vine connection
- Strong stem (no sharp angles or stress points)
- Plenty of vine on both sides of the fruit
Timing Matters
Most growers aim to set their pumpkin within a specific window (often early to mid-summer depending on climate).
Setting too early:
- Smaller plant = less growth potential
Setting too late:
- Less time for the pumpkin to reach maximum size
Dialing in your timing is key to hitting those 1,000+ pound pumpkins.
Selecting “The One”
After a few successful pollinations, you’ll choose the best pumpkin and remove the others.
This is critical.
Your plant has limited energy. Trying to grow multiple pumpkins will split that energy and reduce overall size.
Once you select your keeper:
- Remove all other pumpkins on the plant
- Focus all growth into that single fruit
Early Pumpkin Care
Once your pumpkin is selected, your job shifts to protecting and supporting it.
Early steps include:
- Positioning the pumpkin so the stem isn’t under stress
- Placing sand or a board underneath to keep it dry
- Providing shade during hot days
At this stage, the pumpkin will start growing fast, and it only accelerates from here.
What Comes Next
Now that you’ve selected your pumpkin, it’s time to push growth as hard as possible.
In the next step, we’ll cover exactly how to feed your plant for explosive gains, including how serious growers drive rapid daily weight increases.
Step 6: Feeding for Explosive Growth
Details coming soon…
Step 7: Managing Problems (Bugs, Disease, Splits)
Details coming soon…
Step 8: The Final 30 Days
Details coming soon…
Step 9: Harvest & Weigh-Off
Details coming soon…